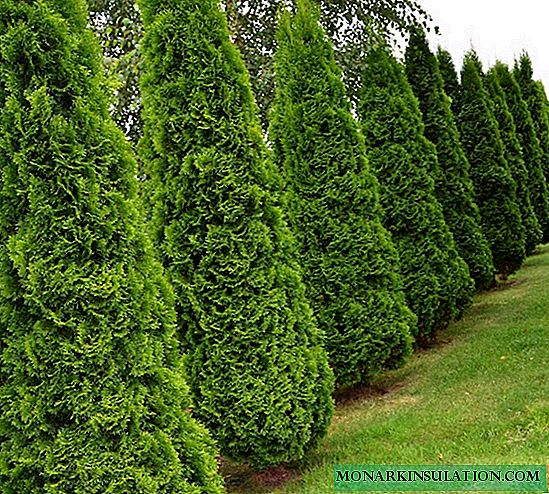
Thuja is an evergreen plant belonging to the cypress family. Juniper, cypress, thuja and other representatives of this genus are widely used in garden design due to their attractive appearance. The desire to plant such a shrub in a summer cottage leads many to look for ways to propagate these plants.
How to breed thuja: a quick and easy way
Thuja propagates in two ways: seeds and cuttings. Each of these options has its own characteristics and difficulties, therefore it requires gardeners at least basic knowledge and experience.
What does it look like
Thuja propagation using seeds is a long process during which the plant goes through several stages of development. The following features are called the advantages of this approach:
- quick adaptation to the region’s climate after transplanting into open ground;
- increased resistance to adverse environmental conditions.
However, there are a number of disadvantages:
- the duration of preparation of seedlings (for growing seedlings from seeds it will take about 5-6 seasons);
- the need for mandatory stratification (by this definition it is customary to understand the exposure of a sprout in the cold);
- low chance of maintaining the qualities of the mother tree.
Cuttings thuja for reproduction is used much more often than seed germination. There are several reasons for this:
- the speed of obtaining seedlings;
- full preservation of the quality indicators of the donor (the tree from which the shoot was cut).
This breeding technology also has disadvantages:
- lower stamina of young trees;
- the survival rate of seedlings after transplantation is only 70-80%.

Thuja propagation by cuttings
Thuja propagation by cuttings in spring
Some experts advise cutting shoots in spring, but there are also propagation techniques in which the roots are harvested in the summer and fall.
If the decision is made in favor of thuja propagation by cuttings in the spring, then the harvesting of shoots must begin immediately after the snow has melted. At this time, the active growth of branches has not yet begun.
Important! If time is lost, and the shoots have grown, it is worth postponing this event for the second half of August. During this period, tree growth slows down.
Gardeners recommend starting work in the spring for several reasons:
- formation of roots requires a minimum of time (about 2-3 months);
- active growth has not yet begun at this time.
However, there is a serious drawback, which is that before winter the plants still do not have time to fully get stronger.
How to grow thuja from a twig
To cut the cuttings quickly gave roots and later well take root on the open ground, gardeners recommend to follow a few tips:
- the right choice of mother tree. When propagated by cuttings, the young tree adopts all the characteristics of the donor;
- cutting shoots and preparing them for further work is the most important component of cultivation;
- the right choice of soil for transplanting thuja affects the growth rate;
- care of seedlings. If the rules of care are not observed, even those plants that have already managed to give roots can die.
The mentioned propagation features are applicable for all varieties of these plants (both spherical and smaragd).
The choice of the mother plant and the time of cuttings
Before you grow a thaw from a twig, you must carefully select a donor tree. The shrub should be completely healthy and strong. From a weak and diseased tree, the shoots take root more difficult, in addition, there is a high risk of getting the same diseased seedling.
No less requirements are placed on the branch from which the shoot will be separated. Best for this purpose is the one located at the top of the bush. Of lateral processes, curved shrubs often grow.
Note! The best way to cut the thuja is to separate the shoots 10-15 cm long and 2-3 years old. The reasons for such growth have already managed to wood.

Thuja sprouts need to be selected and prepared correctly
Preparation of the substrate for rooting
For rooting thuja, a light type of soil, which is characterized by good drainage properties, is best suited. You can choose one of two options:
- clean river sand (it is important that there are no pollution in it);
- substrate.
To prepare the substrate at home, you will need several components:
- sheet earth;
- peat;
- sand.
These components should be mixed in equal proportions. It is recommended to add a solution of potassium permanganate (3%) to the obtained soil, after which the soil is mixed and used as intended.
If sand is used for rooting, then it is preliminarily boiled for 5 minutes, after which it is treated with a potassium permanganate solution.
As containers for planting seedlings, you can use special boxes, cassettes or cans for seedlings. Check for openings (drainage and aeration). Expanded clay is laid at the bottom of the container as a drainage layer and the container is filled with soil.
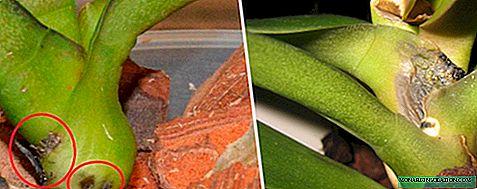
Rules for harvesting cuttings for home rooting
To quickly sprout seedlings, harvesting cuttings must be subject to several conditions. Targeted processes need to be torn from the mother tree. You need to do this with your hands, with a sure sharp movement from top to bottom.
As a result of this action, the shoot should come off with a small piece of last year's tree bark. This part of the handle is called the heel. It contains nutrients that the tree managed to accumulate. As practice shows, branches with a heel give root faster and take root better.
Important! The leaves located near the heel are removed so that there is a 2-3 cm bare trunk below. The upper green leaves of the thuja are cut.
Rooting cuttings with moss
There is an alternative way to breed thuja. This will require moss (sphagnum). The advantage of this option is called rare rotting and the rapid emergence of roots.
To perform this work, you need to stock up on the following materials:
- plastic bag;
- piece of fabric;
- growth stimulator (you can breed any);
- a piece of moss.
First of all, the moss is soaked in cool boiled water. In this form, it should be about 2-3 hours. After this, the sphagnum is placed in the center of a piece of tissue and several cuttings are placed on it. All of them should be at some distance from each other.
The fabric is folded, and then with the help of an elastic band or rope, they are pulled and placed in a bag. In this form, the cuttings should spend some time until the roots appear.
Thuja care before landing at a permanent place
Before transplanting thuja into the ground, it is necessary to take into account several care requirements.
- ambient temperature should be in the range of 18-23 ° C;
- humidity is preferably maintained at a level of 70-75%;
- the place where the seedlings can be planted should be quite bright and sunny, however, the bush must be protected from direct ultraviolet rays;
- regular airing is necessary to maintain optimum temperature conditions.

During rooting, seedlings require constant care
Water the plants carefully, avoiding exposure of the heel. The easiest way to achieve this result when using a spray gun.
Important! Do not overdry the soil, however, waterlogging causes rotting of seedlings. For this reason, thuja sprouts need to be watered only after the topsoil has dried.
How to transplant thuja
Even after the emergence of the roots, thuja sprouts are still not strong enough to plant in a permanent place. For this reason, they are sent for rearing. If thuja was grafted in spring, then the plants are transplanted in September.
For growing, you can use two schemes:
- transplanting into flowerpots;
- transplanting to outdoor garden beds.

You can grow thuja in flowerpots
If preference was given to planting in the open air, then the garden bed should be chosen not in direct sunlight, but in partial shade. The work is carried out taking into account the step by step instructions:
- Before rooting the thaw, you need to dig up the ground. In the process, the soil is fertilized. For 1 m², 0.5 buckets of sand and 1 bucket of peat are required.
- At a distance of 25-30 cm prepare the holes for planting. The size of the holes should correspond to the size of the earthen coma of the plant.
- You need to transplant thuja by transshipment. After this, the lump is covered with a layer of earth and immediately watered.
To protect against cold weather, seedlings are covered with foliage or needles.
For your information! On a temporary bed, young shrubs will grow for 2-3 years, after which strong plants can be planted in a permanent place.

Most often, young plants are transplanted into the open ground
How to transplant adult thuja in another spring
The method of transplanting an adult tree may differ slightly from planting seedlings. The best time for such work is autumn (late September and early October). In this case, it is necessary to take into account the fact that you need to move the tree to a new place before the cold weather. During this time, the bush will be able to give new small roots and become stronger in the soil. The site for planting should be in partial shade. In addition, there should be protection from strong winds.
15 days before the transplant, you need to dig a landing hole. Its depth should be no more than 0.5 m, and a width 3 times the width of the crown of a seedling. The bottom is lined with gravel. This is necessary to prevent stagnation of water.
To remove a tree from the ground, you need to dig it in a circle and carefully remove it. Land remaining on the roots should not be removed. This lump of earth preserves the roots of the plant and helps to quickly adapt to new conditions. Thuja roots are superficial and compact. If very long roots are found, they can be carefully cut with a sharp knife or secateurs.
Important! The place of cut must be treated with a mixture of putty and heteroauxin. Such measures are aimed at combating parasites.
Before planting, you need to pour plenty of water into the hole. Planting soil is prepared from several components:
- peat - 2 parts;
- sand - 1 part;
- turf land - 1 part.
Coniferous litter and humus are added to the resulting soil. After planting, the soil is compacted and watered.

After transplanting, the soil must be abundantly watered.
How to grow thuja from seeds
Those who are going to propagate thawed in a quick and easy way, it is better to choose the planting of cuttings, as seed germination is an extremely laborious and lengthy task.
Only fresh seeds will be required for breeding. Collect them in the fall from September to December. To extract seeds from cones is a simple way. To do this, put the cones in a warm place on paper. During the night they open up and the seeds spill out themselves. It remains only to collect them and begin to grow.
Important! First of all, it is necessary to get rid of diseased seeds. To do this, they are placed in a refrigerator for 2-4 months. When spring comes, the seeds are removed from the cold environment and soaked in warm water. An alternative would be to place the seeds in moist sand for 10-12 hours. Grains swollen from moisture can be planted in the soil.

Soaked seeds are planted in the ground
Growing thuja from seeds at home
There are two ways to propagate thuja from seeds.
- sow seeds on the beds in the garden;
- use boxes for landing. In this case, you can engage in growing seedlings at home or on the loggia.
Pebbles are placed at the bottom of the box as drainage, a layer of sand is poured on top of it, and only then are the boxes or pots filled with prepared soil.
Seeds are planted taking into account the 4 * 4 scheme. All manipulations should be performed carefully, since the root neck should be located at ground level. If this requirement is not taken into account, most seeds will die during germination.

Thuja seeds give good germination
For good moisture, the soil should be regularly sprayed from the spray gun, but do not pour seeds heavily. Top dressing should be carried out regularly - 1 time per month.
Having studied all the features of how thuja propagates, everyone can plant a garden with their own hands or prepare seedlings for sale. Despite the length of the process, financial investments in this case are minimal.